

(Featured Image credits at the bottom)
Welcome back! Hope you enjoyed the last post as much as I did writing it. 😝 Self-hosting in general is really fun, and I find myself setting up things for hours straight sometimes… You can just do so much!
Remember how I set up Ubuntu Server to run all my services? Yup, and Ubuntu Server was actually pretty amazing – everything just worked, nothing ever broke. And at that point, I was happily rocking the ISP router for networking… Yeah, I know, I’ve complained about it so many times in the previous posts, but it worked for the daily internet usage, and offered just enough functionality for me to tinker around.

Port-forwarding was basically all I needed (and all the router had), and the ISP router even excelled at one thing. That is, reconnecting – maybe once in one or two months, the ISP upstream would randomly go down for half an hour. You might remember this post, where I eventually had to switch back main routing functionalities to the ISP router and use my Xiaomi AX3000T routers for WiFi only. And there was only one single reason for this – the Xiaomi router, when used as the “main router”, wouldn’t re-fetch its configuration from upstream after an outage. That meant I had to switch WAN configuration on the Mi router to static, and then back to DHCP to force a re-fetch. And to do that, I had to be on my home network, so if I were unlucky and an outage happens while I’m away, all my port-forwarded services would become inaccessible and I’d have literally no way to fix it… 😔 (a very sad CrunchyCrunch)
And ironically, the ISP is well aware of this problem and has mechanisms in place for their router, so it can automatically re-initiate DHCP and stuff after the upstream goes down… Hmm. 🤔
But that was practically the only good thing about the ISP router. Later, when I tried to set up AdGuard Home (story in the previous post), one problem became very apparent. I elaborated a bit about it in the previous post already, but let’s do a quick recap. Basically, my ISP router wouldn’t allow any changes to the DHCP settings, but my AdGuard Home ran on 192.168.0.3, not on the router. Then I noticed AdGuard Home had an optional built-in DHCP server for cases like this, so I enabled that and disabled the one on my ISP router. IPv4 DNS is now running through AdGuard Home, but that did basically nothing since most of my devices prefer using IPv6… And there are absolutely no options to configure SLAAC/DHCPv6 settings on the ISP router.
Speaking of IPv6, the ISP router was only able to expose services using IPv4 port forwarding. It has an option confusingly named just Firewall, which I thought was some sort of malware protection and in fact just controls the IPv6 forwarding firewall. But even that option would re-enable itself after 24 hours for “security purposes”…
That were two reasons that motivated me to seek for solutions, but ultimately, I wanted an environment where I could learn a bit more about networking stuff in general. IPv6 is eventually taking over (I hope 😝), so I wanted to learn more about it as well. And if I stick with the ISP router for the time being, I would never get to do any of those things.
And then I remembered… Maybe you do too!
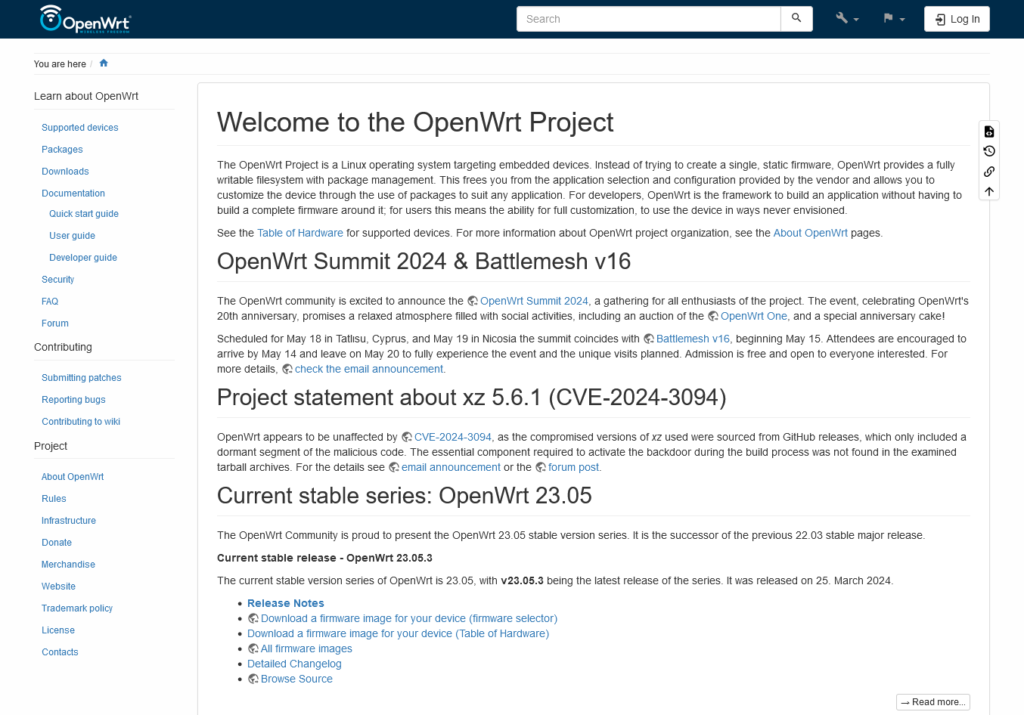
Taken from the official description…
The OpenWrt Project is a Linux operating system targeting embedded devices. Instead of trying to create a single, static firmware, OpenWrt provides a fully writable filesystem with package management. This frees you from the application selection and configuration provided by the vendor and allows you to customize the device through the use of packages to suit any application. For developers, OpenWrt is the framework to build an application without having to build a complete firmware around it; for users this means the ability for full customization, to use the device in ways never envisioned.
openwrt.org
Not gonna read through that. 😛 Here’s my explanation.
Basically, the version of OpenWrt you can go and download is an open-source alternative firmware/OS for routers that allows more control and customization than normal manufacturer firmware. If you tinkered around with Android, it’s a bit like flashing custom ROMs and enabling root access so you can modify every component of the system. Probably not quite accurate though… 🙃 It’s Linux-based, and most Linux software could probably run on there, but has an important difference to an ordinary desktop Linux distro – we’ll get to that later. The officially supported way is to grab one of the images on the download page and flash it to a supported router. But you can also install OpenWrt on any x86_64/AMD64 device (my home server) with a generic image. It comes with two interfaces pre-configured, WAN and LAN, in most cases mapped to eth1 and eth0 respectively, so it’s plug-and-play after the first installation.
For me, I could just follow the official documentation and get OpenWrt installed on my home server. I took a couple of extra steps, though – I attached an HDD earlier for my Nextcloud instance and Jellyfin media library (don’t worry, posts are on the way), to which I backed up my server configuration and data. This was easy since I was using Docker for practically everything and had everything bind-mounted and organized in one place (/home/crunchycrunch/server).
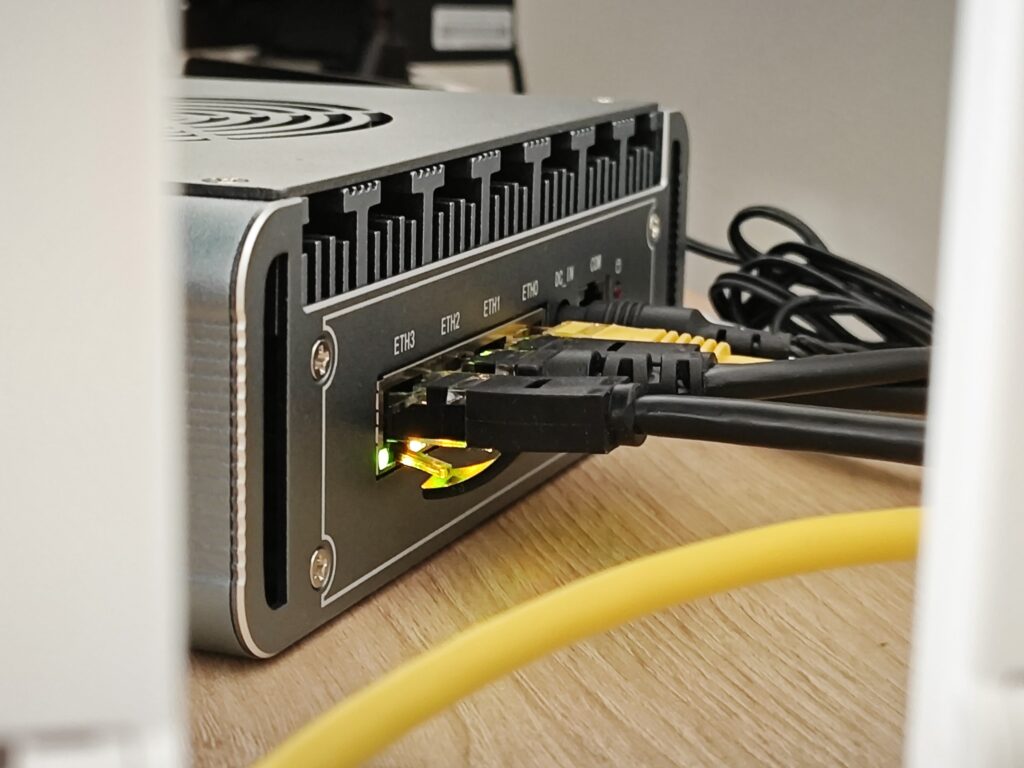
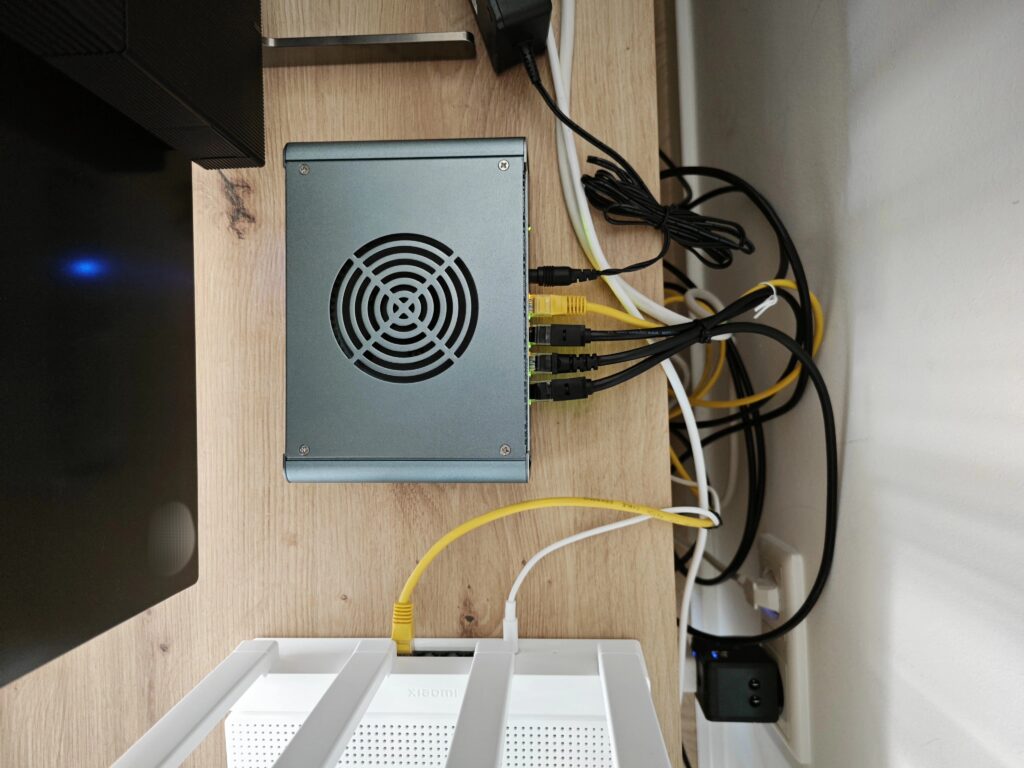
After I did that, I took out the system SSD out of the server where Ubuntu Server was still installed, and flashed it with OpenWrt’s image according to the official guide, with Fedora 40 KDE Spin (why did I mention its full name though). After reinstalling the SSD and making sure the interfaces were properly configured, I switched the ISP router to bridge/modem mode once again and plugged all devices I had into the server, now loaded with OpenWrt. Actually, compare it with pictures from this post! It now has more flashing lights and definitely looks cooler.

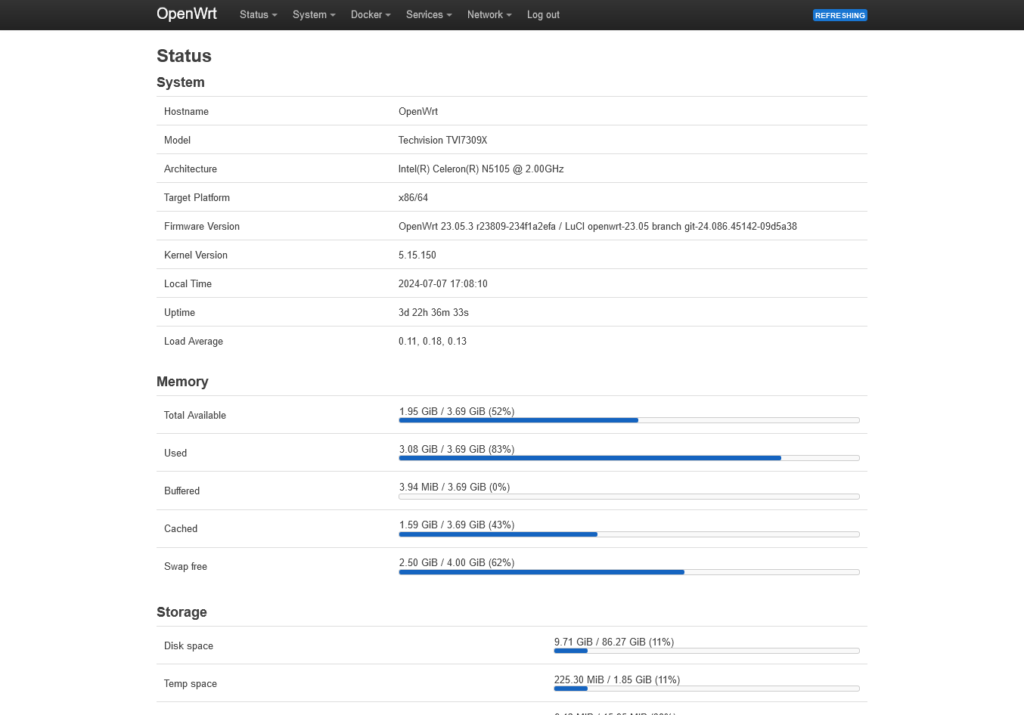
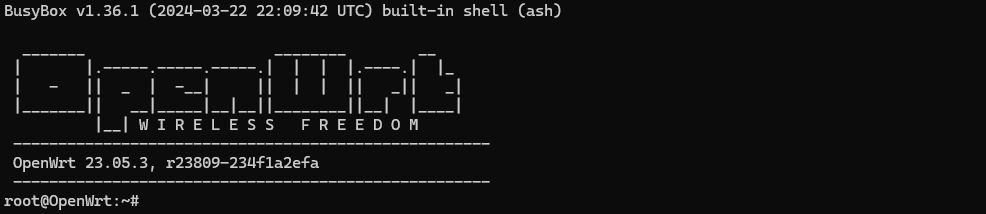
Now, since OpenWrt is a fully-featured router OS, it of course comes with a WebUI for management. It’s referred to as LuCI, and looks like this:
There are also the uci command-line tool and some OpenWrt-specific configuration files which sort of wrap around other Linux networking components. Those are accessible over a shell e.g. SSH, but the WebUI exposes most advanced configuration options already – in fact, there are even “extensions” for LuCI you can install to control stuff like Docker right from the WebUI! Now I finally know what I was looking for when learning networking… Speaking of which, check out NetworkChuck on YouTube. I learned a lot about networking from this channel, and I don’t suck at subnetting anymore!
Okay, I know you’ve been holding it in for very long. You may let it out now…
“What you’re referring to as Linux, is in fact, GNU/Linux…”
Nope, stop, that’s wrong.
You see, OpenWrt uses the Linux kernel – and there’s absolutely no doubt in it. But it doesn’t use GNU for most parts – it uses Busybox instead. This is also the aspect that sets it wide apart from the rest of the Linux world. Busybox targets small and embedded devices, which is evident from its size alone. It aims to implement the most used UNIX commands with their respective most-used parameters, so a lot of advanced functionalities are missing. But the fact that everything is inside a single executable is… pretty impressive! No wonder why OpenWrt went with Busybox.
This minimalistic packaging decision goes for all software distributed in OpenWrt, and that took me a while to realize… OpenWrt doesn’t include things you won’t need on a router, neither pre-installed, pre-configured, nor in its repositories for its opkg package manager. There’s basically no way to spin up a GUI with one command, or setup any sort of hardware acceleration – even with open source drivers like the ones for Intel GPUs and AMD GPUs… At least without completely disfiguring the system. 🙃 The kernel was also compiled with some kernel parameters disabled, and it caused some problems for me that I could luckily work around – more on that in a second.
Now that OpenWrt is installed and running for a while, it was time to bring my Docker services back online. And that’s when all sorts of problems start to happen…
Right after installing Docker and spinning up my first service – WordPress, I believe, I noticed that the containers were completely isolated, and there was neither connectivity from host to container nor between the containers. I spent an entire afternoon trying to figure this out, and apparently, Docker uses iptables to configure firewall rules automatically, but OpenWrt defaults to nftables and there was no wrapper script in-between. It requires tweaking the firewall manually, but the fix was fairly simple, though – if it didn’t take me about another week to figure out… 🤪
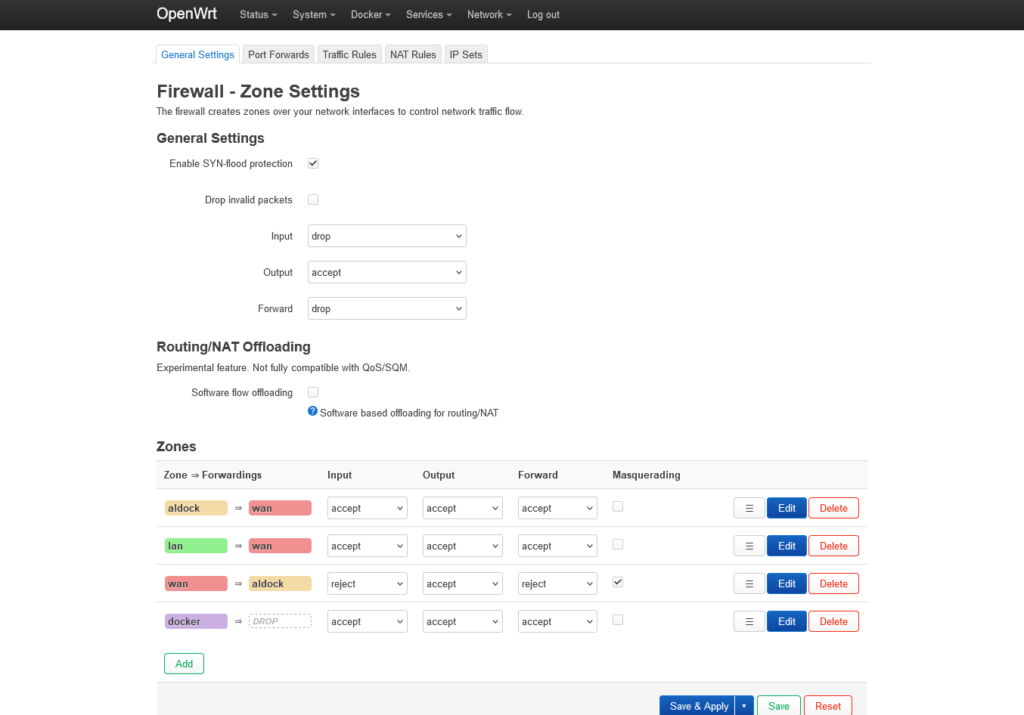
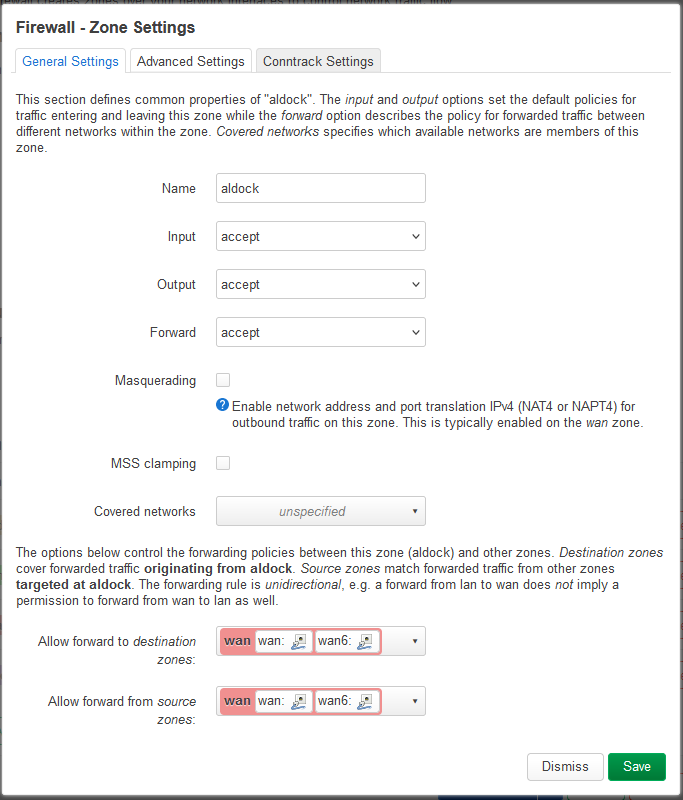
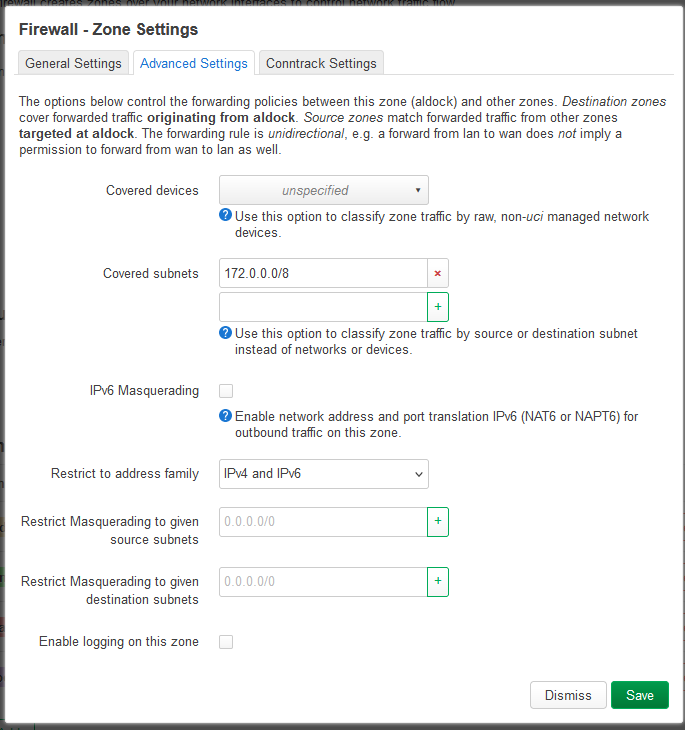
I created a new zone called aldock (allow Docker, yeah… the name), and it covers the subnet 172.0.0.0/8, from which subnet Docker bridge networks allocate smaller subnets like 172.18.0.0/16 by default. And afterwards, I just allowed it the zone to forward from and to the WAN zone, and set all chains to accept. Not sure if security could be done better, but since those addresses shouldn’t be addressable from outside, I’m just going to assume I’m safe…
But that was just allowing traffic between the containers and the WAN so the containers have “internet access”. Now we need to somehow make inbound access to the containers possible, so we can access whatever service is running in there. This was a smaller problem for me, since I reverse proxy everything with an nginx instance (post on its way) running with host network mode. That way, nginx can access all bridge networks and can listen on all host interfaces directly without port-forwarding and all that mess. To avoid conflicts with the default HTTP/S ports, I just moved the LuCI interface of the router to another port.
All I had to do additionally was to allow port 80 and 443, via traffic rules:
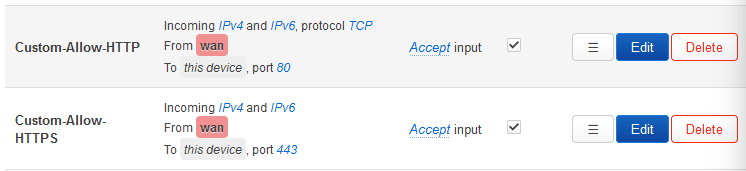
The LAN zone was already set to accept on all chains, so listening on LAN addresses was no problem.
Since I set nginx to access the “upstream” containers using fixed IP addresses like 172.18.0.something, I’m not going to touch anything related to Docker network configuration now. It’s just not worth the risks of breaking something because a subnet changed after network recreation… 😵 Specifying fixed subnets had other weird effects, so I’m just going to leave everything as-is.
Also, to allow traffic to the Nextcloud Master Container management interface, I had to open port 8080 additionally. And when setting up Nextcloud, I noticed another problem…
When pulling the image, this error would keep coming up:
   ✔ 4abcf2066143 Already exists                                           0.0s
   ✔ 64d2971301bc Pull complete                                            1.0s
   ✔ cc6eca4f1862 Pull complete                                            1.0s
   ✔ b5d35b189a56 Pull complete                                            1.0s
   ✔ e4edc397ae5a Pull complete                                            1.3s
   ✔ 61392208410a Pull complete                                            1.3s
   ✔ bee5804676fa Pull complete                                            3.2s
   ✔ 51b55d7a64eb Pull complete                                            3.2s
   ✔ 1de2bd55d517 Pull complete                                            6.6s
   ✔ a326e5f4c37a Pull complete                                            6.6s
   ⠿ d630d07ded49 Extracting       14.64MB/14.64...                        9.8s
   ✔ a4242c1aebc5 Download complete                                        7.4s
   ✔ 79c7df51942c Download complete                                        7.0s
   ✔ 3302431a828c Download complete                                        7.9s
   ✔ f52aa223cc7a Download complete                                        7.8s
   ✔ 32420f8e2209 Download complete                                        8.2s
   ✔ 930390356495 Download complete                                        8.4s
   ✔ 267204048c7c Download complete                                        8.6s
failed to register layer: lsetxattr security.capability /usr/bin/caddy: operation not supported
After another afternoon of research, I found out it’s a combination of issues in the kernel and the default root filesystem parameters… I have a few links in this GitHub discussion thread if you want to learn more. 😛 But the easiest fix I found was to mount a BTRFS filesystem to /opt/docker, so I shrunk the root partition, created a 30GB partition with BTRFS and mounted it to /opt/docker. Also, I configured Docker to use BTRFS as its storage driver. Not sure if it was necessary, but everything worked fine afterwards. ¯\_(ツ)_/¯
If you have no idea of what I just talked about, just take it as a warning if you ever had the idea of daily-driving any embedded Linux distribution on a gaming PC… 🤪
And after some days of usage, the old problem appeared once again – the router wouldn’t reconnect after the upstream goes down. I kind of saw this coming, since the Mi router firmware had this problem and was based on OpenWrt, so “vanilla” OpenWrt probably wouldn’t do this any better – and I was right. 😛 But there was one difference on vanilla OpenWrt – you can do anything, and that meant you could modify the system to add functionality or fix things that don’t work out of the box. So, to watch out for upstream outages and restart my interfaces if this happens, I wrote a small script that runs every minute as a cron job. I don’t know a lot about shell scripting, so this script was thrown together with the help of Google and ChatGPT… I need to learn some shell scripting some time. 🤪
#!/bin/sh

DOMAIN="google.com"

# Use nslookup to check DNS resolution
if nslookup "$DOMAIN" >/dev/null 2>&1; then
    echo "DNS resolution successful for $DOMAIN"
    exit 0
else
    echo "DNS resolution failed for $DOMAIN ; will restart AGH"
    echo Restarting AGH
    service adguardhome restart
fi

if nslookup "$DOMAIN" >/dev/null 2>&1; then
    echo "After restarting AGH: DNS resolution successful for $DOMAIN"
    exit 0
else
    echo "Still not working after restarting AGH... Will restart wan and wan6"
    echo Down interfaces
    ifdown wan
    ifdown wan6
    echo Sleeping 2 seconds
    sleep 2
    echo Up interfaces
    ifup wan
    ifup wan6
fi
Finally, there was an issue that I couldn’t really fix… That was Jellyfin hardware acceleration, which could have used the iGPU of the Celeron N5105 to take some load off of the CPU. Since the N5105 is Jasper Lake, Jellyfin requires LP-mode encoding which I couldn’t manage to enable. Funny thing, when writing this post, I just found a thread that seems to have an answer to my problem… Let’s see if I can figure this out. I’ll keep you updated. 😛 For now, I configured a 4GB swap file so my server doesn’t crash when any service fills up the RAM.
But yeah, once OpenWrt is set up, there’s nothing that stops you from configuring everything you ever wished for. Custom DHCP, DNS, firewall rules, or maybe even selective VPN routing based on destination IP address! The only boundaries here are your imagination. Anyways, that was everything I got for you today, and I hope I could get you a somewhat comprehensive insight on OpenWrt. See you next post!
Author of featured image: Me.
Used material:
https://svgsilh.com/image/1294340.html
https://en.wikipedia.org/wiki/Tux_(mascot)#/media/File:Tux.svg
#/media/File:Tux.svg)
Leave a Reply
You must be logged in to post a comment.